Rebuilding a package for Umbraco 15

Thanks to the awesome Umbraco community, the Umbraco Templates for dotnet new includes a package starter example in Umbraco 15 🎉
The example includes:
- A dashboard showcasing various common tasks for backoffice extension.
- A complete build setup for Vite.
- Scripts for generating OpenAPI clients with Hey API.
- A pre-configured .NET project that builds as a Razor Class Library (RCL).
- …and loads more stuff.
This is brilliant news for everyone that’s finding it hard to get started with package development for Umbraco 14+ - like yours truly 😉
For me, I figured the package starter example would make an excellent starting point for porting my No-Code Delivery API package to Umbraco 15.
In the following I’ll take you through the process as I approached it (which is by no means to say you should follow the same approach). I’ll highlight some of the challenges encountered and lessons learned, thus hopefully paving the way for others.
The package source is of course freely available in the package GitHub repository for you to inspect and dissect as you please.
Creating the package project
The package UI was originally written for Umbraco 13 in JavaScript. That is - no Vite, no TypeScript, no nothing fancy. I am a backender, after all 🙈
Instead of attempting to port the original project to Umbraco 15 standards, I decided to start a new project from scratch using the dotnet new template, and then recreate the functionality afterward from the original source.
To create a project with the package starter example, run:
dotnet new install Umbraco.Templates::15.0.0
dotnet new umbraco-extension --include-example --site-domain 'https://localhost:44346'
In this case, the --site-domain argument corresponds to the local URL of the test site project I’ve got bundled up in the package repo.
Porting over the package API
The package API powers the backoffice UI of the package. It was originally based on the UmbracoAuthorizedJsonController, which no longer exists in the Umbraco core.
Since Umbraco 14, a backoffice API is in principle just a standard .NET API controller with an authorization policy. However, to make your life easier, there are some recommendations I would urge you to follow:
- Base your API controllers on the
ManagementApiControllerBaseclass. This ensures basic authorization, proper JSON formatting and a little plumbing. - Use the
OperationStatusResultin conjunction withProblemDetailsto communicate error scenarios to the API consumers. - Create a custom OpenAPI document for your API. This allows for generating an API client specifically for your API.
- Document your endpoints with proper return types, so the API client becomes strongly typed.
- Apply the Umbraco conventions for operation and schema IDs to your OpenAPI document, so your APIs conform to the Umbraco APIs.
For my package, the implementation of these recommendations were pretty straight-forward, more or less just copying things over from the Umbraco docs. The result can be found in the controller base class and the package composer.
Generating the API client
Next order of business was to generate the TypeScript API client.
As mentioned above, the package starter example includes a setup to do this, and the NPM scripts are preconfigured to generate an API client for the example API.
In my case, I moved my package API to another OpenAPI document, so I had to point the scripts in the right direction. Here are the steps involved:
- Find your OpenAPI document in Swagger UI (
/umbraco/swagger) and copy the path to the document:
- Update the
generate-clientscript in/Client/package.jsonto use the document path as argument:
Now the API client can be generated by executing the generate-client script:
cd ./Client
npm run generate-client
Porting over the package UI
I’ll be honest… my package was not written with an Umbraco V14+ upgrade in mind. At all 🙉
So, the entire package UI had to be rewritten, which was by far the biggest task. This was also where I got stuck the most.
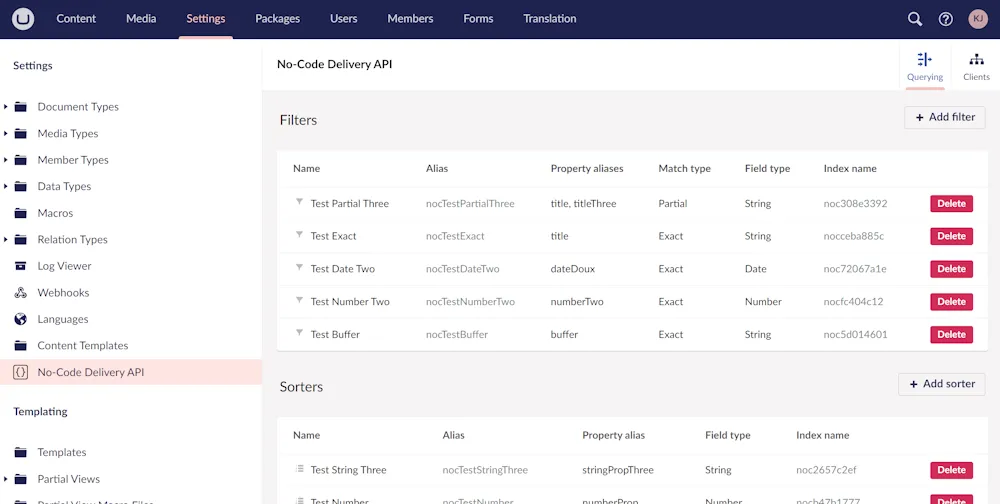
Here’s what the package UI looks like in Umbraco 13:

It’s pretty much “just” a left side menu item, which links to a view with a few content apps. The package data is listed in tables, and all editing is performed in infinite editors.
The menu item
Umbraco 14+ uses “manifests” to register all UI extensions for the backoffice. You’ll find a fair few of these in the package starter example.
Conveniently, one of the built-in extension types is a menu item, so it’s gloriously simple to add a new one:
export const manifests: Array<UmbExtensionManifest> = [
   {
      type: 'menuItem',
      alias: 'Kjac.NoCode.DeliveryApi.MenuItem',
      name: 'No-Code Delivery API Menu Item',
      weight: 200,
      meta: {
         label: 'No-Code Delivery API',
         icon: 'icon-brackets',
         entityType: 'no-code-delivery-api',
         menus: ['Umb.Menu.AdvancedSettings'],
      },
   },
   // ...
];
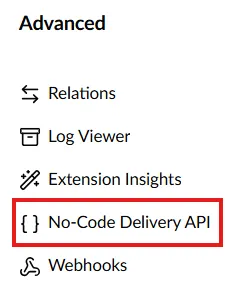
Voilà! a brand-new menu item in the Advanced part of the Settings section menu:

The Umbraco 13 equivalent required 50+ lines of C#, so I’d say this was getting off easy 👏
The workspace
Since my package defines its own set of views from scratch, I had to create a “workspace”. The workspace acts as a container (or host, if you will) for functionality, including views:
The workspace is also a built-in extension type, which is registered in the manifest like this:
export const manifests: Array<UmbExtensionManifest> = [
   {
      type: 'workspace',
      kind: 'default',
      alias: 'Kjac.NoCode.Delivery.Api.Workspace',
      name: 'No-Code Delivery API Workspace',
      meta: {
         entityType: 'no-code-delivery-api',
         headline: 'No-Code Delivery API'
      },
   },
   // ...
];
The workspace views
This was where the fun started for real 🤓
Workspace views are (you guessed it) views contained within a workspace. You can consider them the equivalent of content apps in Umbraco 13:
Once again, a workspace view is a built-in extension type, and once again they’re registered in the manifest:
import { UMB_WORKSPACE_CONDITION_ALIAS } from '@umbraco-cms/backoffice/workspace';

export const manifests: Array<UmbExtensionManifest> = [
   // ...
   {
      type: 'workspaceView',
      alias: 'Kjac.NoCode.Delivery.Api.Workspace.Filters',
      element: () => import('./views/filters/filter-list.ts'),
      name: 'No-Code Delivery API Filter List Workspace View',
      meta: {
         label: 'Filters',
         pathname: 'filters',
         icon: 'icon-filter'
      },
      conditions: [
         {
            alias: UMB_WORKSPACE_CONDITION_ALIAS,
            match: 'Kjac.NoCode.Delivery.Api.Workspace',
         },
      ],
   },
   // ...
];
There’s quite a bit going on here, but the important parts are:
- The
elementis a factory that imports the concrete view implementation. - The
conditionsspecify where the view should be injected in the backoffice.
I won’t go into detail about the view implementation, because they will be specific to whatever package you’re building. You can find the above-mentioned view in the GitHub repo, but it might not make a lot of sense until you’ve read the next sections.
You can also read more about workspace views in the official docs article.
Workspace context
As it turns out, I wasn’t entirely done with workspaces just yet, because a workspace can also define a “context”.
Uh… a whatnow? 🤔
More often than not, a workspace spans multiple views, each of which manages different parts of the same entity. But these views are decoupled - they exist in the context of the workspace and have no knowledge of one another.
The workspace context allows for sharing the entity across all workspace views, to retain the entity state while editing the different parts. Logically, this also means that the workspace context becomes responsible for interacting with the API for entity retrieval and updates.
In my case I don’t have a single entity. I have lists of filters, sorters and clients, each of which are managed within their own workspace view. So the normal use case for a workspace context does not apply here.
Now… I admit it: I had cut corners in my implementation. I had allowed the views to load their own entities directly from the API. This caused the entities to be loaded over and over again when flipping back and forth through the workspace views 🤦
Workspace context to the rescue!
…unfortunately, due to a slight issue in the Umbraco client, custom workspace contexts won’t resolve for custom workspaces like mine. As a workaround I had to register my workspace context as a global context instead 🙄
As with all other extensions, the context must be registered in the manifest:
import { UMB_WORKSPACE_CONDITION_ALIAS } from '@umbraco-cms/backoffice/workspace';

export const manifests: Array<UmbExtensionManifest> = [
   // ...
   {
      type: 'globalContext',
      alias: 'Kjac.NoCode.Delivery.Api.Workspace.Context',
      name: 'No-Code Delivery API Workspace Context',
      api: () => import('./workspace.context.ts'),
   },
   // ...
];
The api factory must resolve an implementation of UmbContextBase<T>:
import {UmbContextBase} from '@umbraco-cms/backoffice/class-api';

export class WorkspaceContext extends UmbContextBase<WorkspaceContext> {
   constructor(host: UmbControllerHost) {
      super(host, NO_CODE_DELIVERY_API_CONTEXT_TOKEN);
   }
   // ...
}
…where NO_CODE_DELIVERY_API_CONTEXT_TOKEN is a “context token”. It must be an implementation of UmbContextToken<T>:
import {UmbContextToken} from '@umbraco-cms/backoffice/context-api';

export const NO_CODE_DELIVERY_API_CONTEXT_TOKEN = new UmbContextToken<WorkspaceContext>(
   'Kjac.NoCode.Delivery.Api.Workspace.Context'
);
With the context token in place, the views can finally consume the workspace context using the context API:
import {UmbLitElement} from '@umbraco-cms/backoffice/lit-element';
import {NO_CODE_DELIVERY_API_CONTEXT_TOKEN} from '../../workspace.context.ts';
import {FilterDetails} from '../../models/filter.ts';
import {customElement, state} from '@umbraco-cms/backoffice/external/lit';

@customElement('no-code-delivery-api-filters-workspace-view')
export default class FiltersWorkspaceViewElement extends UmbLitElement {
   #workspaceContext?: typeof NO_CODE_DELIVERY_API_CONTEXT_TOKEN.TYPE;

   @state()
   private _filters?: Array<FilterDetails>;

   constructor() {
      super();
      this.consumeContext(NO_CODE_DELIVERY_API_CONTEXT_TOKEN, (instance) => {
         this.#workspaceContext = instance;
      });
   }

   async connectedCallback() {
      super.connectedCallback();
      await this._loadData();
   }

   private async _loadData() {
      this._filters = await this.#workspaceContext?.getFilters() ?? [];
   }

   // ...
}
Here’s a link to my workspace context implementation, and another one to the filters workspace view that consumes the context.
Sidebar modals (aka infinite editors)
As mentioned before, all editing is performed using infinite editors in the Umbraco 13 package UI. A sidebar modal is the equivalent of an infinite editor in V13.
It is yet another built-in extension point, and it too needs registering in the manifest:
export const manifests: Array<UmbExtensionManifest> = [
   // ...
   {
      type: 'modal',
      alias: 'Kjac.NoCode.Delivery.Api.Modal.EditFilter',
      name: 'No-Code Delivery API Edit Filter Modal View',
      element: () => import('./views/filters/edit-filter.ts')
   },
   // ...
];
Here, the element factory is expected to produce an implementation of UmbModalExtensionElement<TData, TValue>, where TData and TValue are container classes for the modal input and output data, respectively:
import {UmbLitElement} from '@umbraco-cms/backoffice/lit-element';
import type {UmbModalContext, UmbModalExtensionElement} from '@umbraco-cms/backoffice/modal';
import {FilterDetails, FilterBase} from '../../models/filter.ts';

export type FilterModalData = {
   headline: string;
   filter: FilterDetails;
}

export type FilterModalValue = {
   filter: FilterBase;
}

@customElement('no-code-delivery-api-edit-filter-modal-view')
export default class EditFilterModalElement
   extends UmbLitElement
   implements UmbModalExtensionElement<FilterModalData, FilterModalValue> {

   @property({attribute: false})
   modalContext?: UmbModalContext<FilterModalData, FilterModalValue>;

   @property({attribute: false})
   data?: FilterModalData;

   @property({attribute: false})
   value?: FilterModalValue;

   // ...
}
The modal implementation must define a few properties:
modalContextallows for controlling the modal flow - that is, handling modal submission or cancellation.datais the input data for the modal. It is supplied by the consumer when the modal is invoked.valueis the output value from the modal. It should be set when the modal is submitted.
Just like the workspace context defines a context token, the modal defines “modal token” for consumption. The modal token is an implementation of UmbModalToken<TData, TValue>:
import {UmbModalToken} from '@umbraco-cms/backoffice/modal';
export const NO_CODE_DELIVERY_API_FILTER_MODAL_TOKEN = new UmbModalToken<FilterModalData, FilterModalValue>(
   'Kjac.NoCode.Delivery.Api.Modal.EditFilter',
   {
      modal: {
         type: 'sidebar',
         size: 'small'
      }
   }
);
As you can see, the modal token also defines the modal behaviour (type and size).
The modal is triggered by passing the modal token to the “modal manager context”, which is consumed using the context API:
import {UmbLitElement} from '@umbraco-cms/backoffice/lit-element';
import {UMB_MODAL_MANAGER_CONTEXT} from '@umbraco-cms/backoffice/modal';
import {NO_CODE_DELIVERY_API_FILTER_MODAL_TOKEN} from './edit-filter.ts';
import {FilterDetails} from '../../models/filter.ts';
import {customElement, state} from '@umbraco-cms/backoffice/external/lit';

@customElement('no-code-delivery-api-filters-workspace-view')
export default class FiltersWorkspaceViewElement extends UmbLitElement {
   // ...
   #modalManagerContext?: typeof UMB_MODAL_MANAGER_CONTEXT.TYPE;

   @state()
   private _filters?: Array<FilterDetails>;

   constructor() {
      super();
      // ...
      this.consumeContext(UMB_MODAL_MANAGER_CONTEXT, (instance) => {
         this.#modalManagerContext = instance;
      });
   }

   // ...

   private _editFilter(filter: FilterDetails) {
      const modalContext = this.#modalManagerContext?.open(
         this,
         NO_CODE_DELIVERY_API_FILTER_MODAL_TOKEN,
         {
            data: {
               headline: 'Edit filter',
               filter: filter
            }
         }
      );
      modalContext
         ?.onSubmit()
         .then(value => {
            // the modal was submitted, do stuff with value here.
            // value is of type FilterModalValue as per the modal token definition (TValue).
         })
         .catch(() => {
            // the modal was cancelled, do nothing.
         });
   }

   // ...
}
Yeah, it’s a bit of work to get there… but once you get the hang of it, it’s actually a pretty neat pattern to work with 🔧
Hey API gotchas
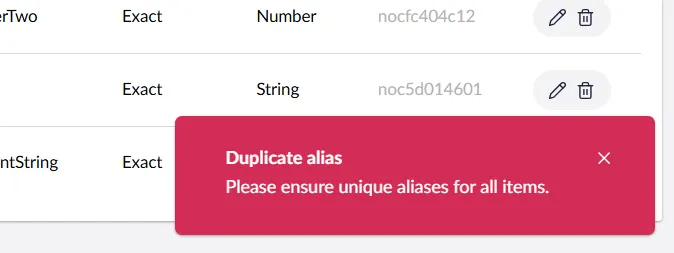
The Umbraco client has a nice utility method for executing API calls called tryExecuteAndNotify. As you might have guessed, it attempts to execute the API call and displays an error message if something goes wrong:

If you want to use this method, you need to jump through a few hoops at the time of writing.
Hey API must be reconfigured to use the 'legacy/fetch' client when generating the API client, instead of the default '@hey-api/client-fetch'. This is done in the generate-openapi.js script, which is created as part of the package starter example:
   // ...

   createClient({
      client: 'legacy/fetch',
      input: swaggerUrl,

   // ...
This changes the generated API client quite profoundly, so you’ll likely have to amend any current usages throughout your code.
You will also need to amend the OpenAPI auth setup in the package entry point:
   // ...

   _host.consumeContext(UMB_AUTH_CONTEXT, async (authContext) => {
      const config = authContext.getOpenApiConfiguration();

      OpenAPI.BASE = config.base;
      OpenAPI.TOKEN = () => authContext!.getLatestToken();
      OpenAPI.WITH_CREDENTIALS = true;
   });

   // ...
Phew 😅
Some say that all beginnings are difficult. That was certainly true for me when embarking on this project.
This was my first real project with the new backoffice. Being a backender with just enough AngularJS skills to hack it for Umbraco extensions, the learning curve towards the new backoffice was steep to say the least.
The Umbraco client itself also threw a few spanners in the works, which didn’t make the project any easier. I’ve mentioned a few of the issues I ran into; those are the ones that have yet to be resolved in the client. There were other issues too, but fortunately they have been resolved in the later versions of the core NPM package 😊
All these challenges aside, I have come to really appreciate the new backoffice. Once the basic concepts have sunk in, it’s really nice to work with, and it’s quite the engineering feat too. In fact, I’m already making great progress on a brand new V15 package - but that’s for another blog post.
This was once again a lengthy post. If you stuck with it till the end, hopefully it’ll help you get started with the new backoffice 🤗
Happy package building 💜