Umbraco to Relewise with Workers

In a composable world it’s becoming ever more important to be able to integrate systems with ease. Umbraco is built for extensibility and thus it is relatively simple to integrate Umbraco content with other systems.
That is, if you’re a .NET developer 😐
In this post I’ll try to go a different route for integrating Umbraco with another system; that is, a route that is not reserved for .NET developers. The goal is to update a Relewise product index whenever an Umbraco Commerce product is published or unpublished within Umbraco.
As my dataset I’ll be using the database from the Umbraco Headless Demo for Umbraco Commerce. To keep the complexity of the demo down, I have created my own Umbraco site with Umbraco Commerce installed and just the bare-bone setup required for this post.
The demo source code is as always available on GitHub. Check the repo for instructions on how to run the demo locally.
Relewise 101
Relewise offers personalized search and recommendation, specifically tailored for content and commerce. In their own words, Relewise is “a personalization platform like no other”.
The platform is built to understand and adjust to user intent in real-time, as well as to adapt instantly to data updates (e.g. when the product catalog changes).
In my personal experience, Relewise is among the absolute best at what they do. Hands down, I am in absolute awe at what this platform can do 🤩
…and no. No-one paid me to say that 😉
Getting data from Umbraco
To get this ball rolling, Umbraco needs to push data whenever a product is published or unpublished. This is a straight-forward task, because Umbraco ships with webhooks as an integrated feature.
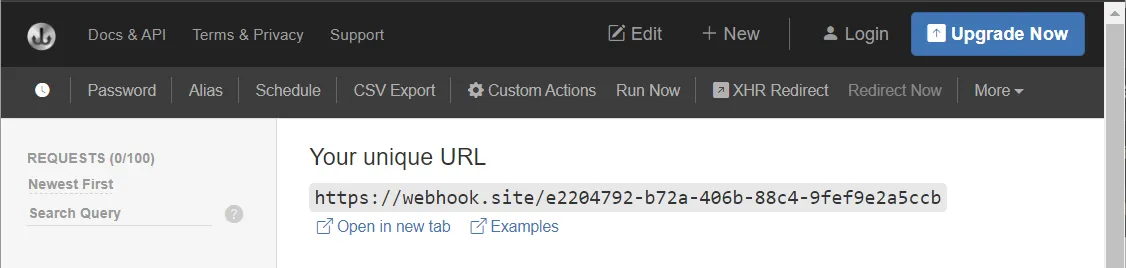
A webhook however needs a destination. To this end, I highly recommend using Webhook.site as a tool for testing webhooks in the development phase:
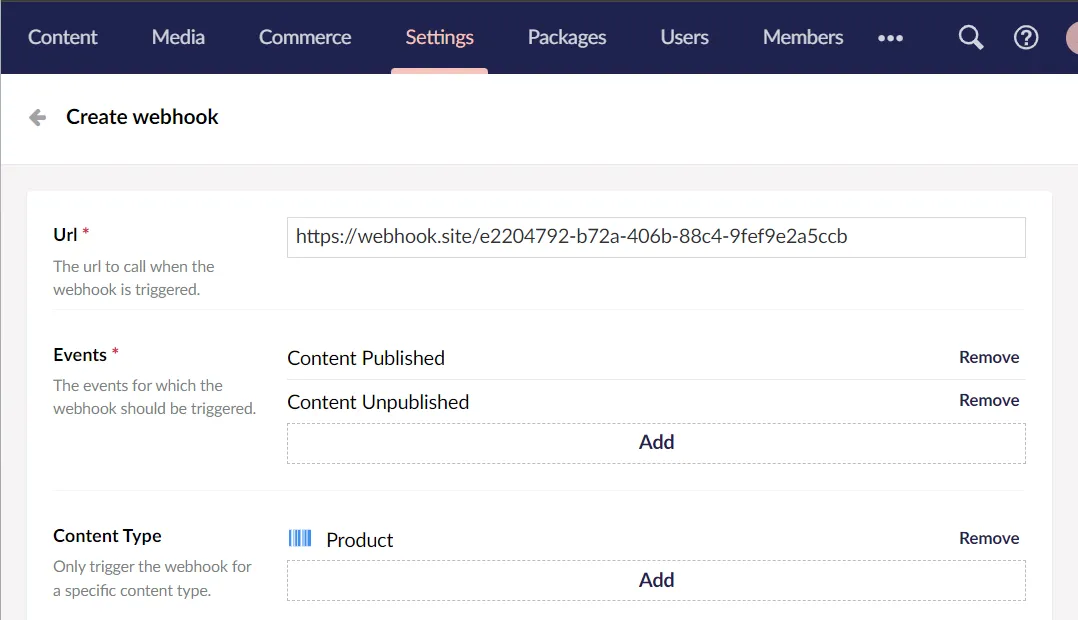
Now setup an Umbraco webhook that uses Webhook.site as its destination:
With this in place, the webhook executes when publishing or unpublishing products in Umbraco. The resulting webhook payload can be inspected at Webhook.site:
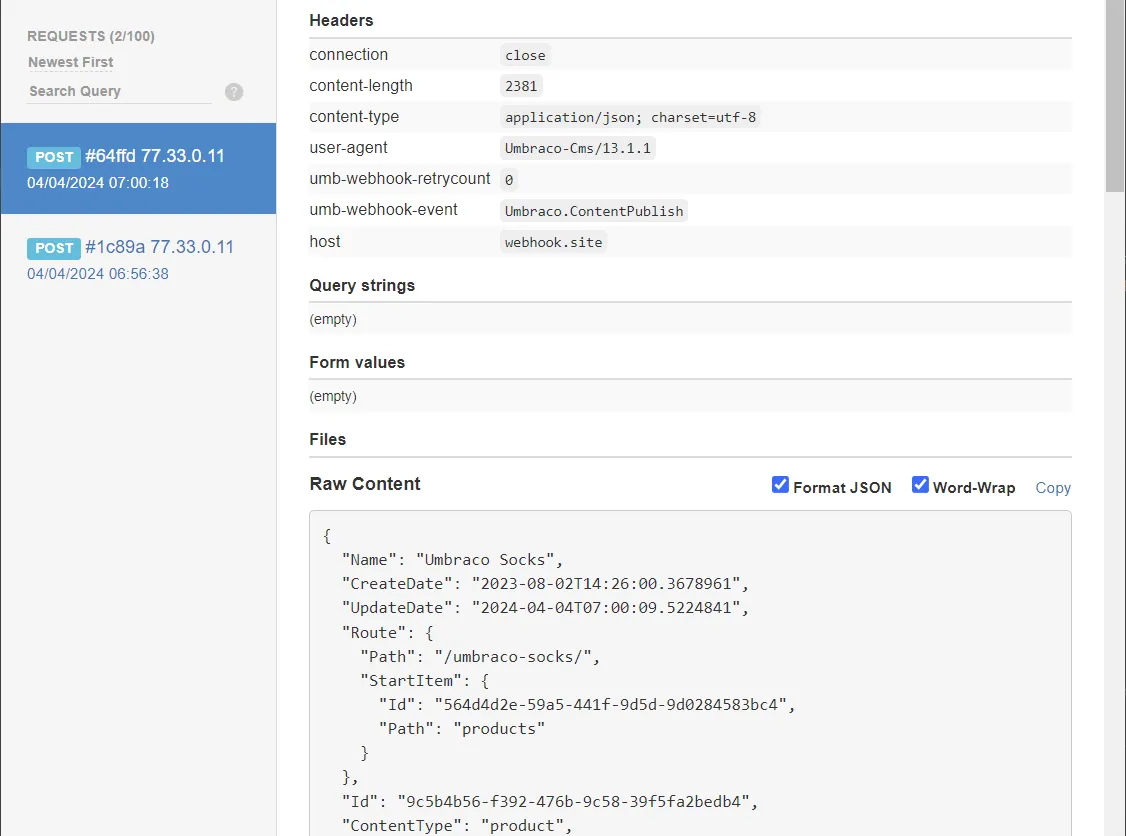
If you look closely, you’ll see that the Umbraco webhook passes an umb-webhook-event header. This contains an indication the event that triggered the webhook (content publish or unpublish in this case). That’ll come in handy later.
So far, so good 👍
The integration layer
The product data needs to go somewhere that can push it to the Relewise API. I have chosen Cloudflare Workers as my integration layer because:
- I’m curious about them.
- They can be written in JS.
- They come with a very generous free tier.
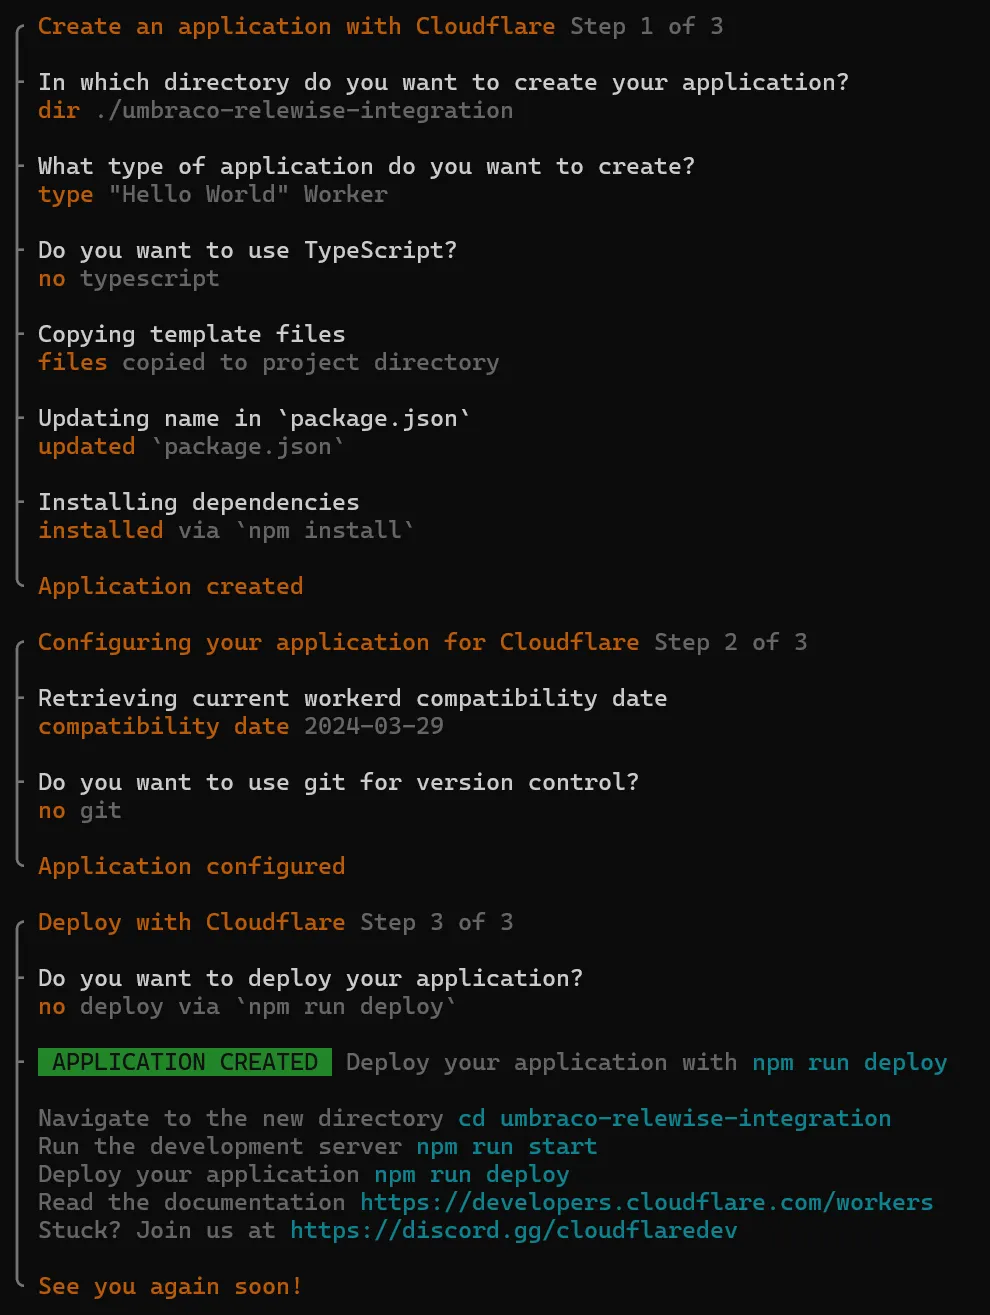
So let’s setup a Worker project. Open up a terminal and go:
npm create cloudflare@latest
The Cloudflare CLI goes on to ask a bunch of questions, after which a “Hello World” Worker project is ready to go:
In theory I can “just” invoke this Worker with a POST from my Umbraco webhook. Let’s put that to the test.
In the Worker project, edit /src/index.js so it outputs the request as its response when handling both publish and unpublish events from Umbraco:
export default {
    async fetch(request, env, ctx) {
        if (request.method !== 'POST') {
            return new Response('Expected a POST request', {
                status: 405,
            });
        }

        const event = request.headers.get('umb-webhook-event');
        const json = await request.json();

        switch (event){
            case 'Umbraco.ContentPublish':
                return await handlePublish(json);
            case 'Umbraco.ContentUnpublish':
                return await handleUnpublish(json);
            default:
                return new Response(`Unable to handle event: ${event}`, {
                    status: 400,
                });
        }
    },
};

async function handlePublish(json) {
    // just return the request payload as the response for now
    return Response.json(json);
}

async function handleUnpublish(json) {
    // just return the request payload as the response for now
    return Response.json(json);
}
Fire up the Worker with npm run start:

Now update the Umbraco webhook with the Worker URL and invoke the webhook again by publishing a product. Shortly after you’ll find a new entry with the Worker URL in the “Deliveries” section of the Umbraco webhooks:
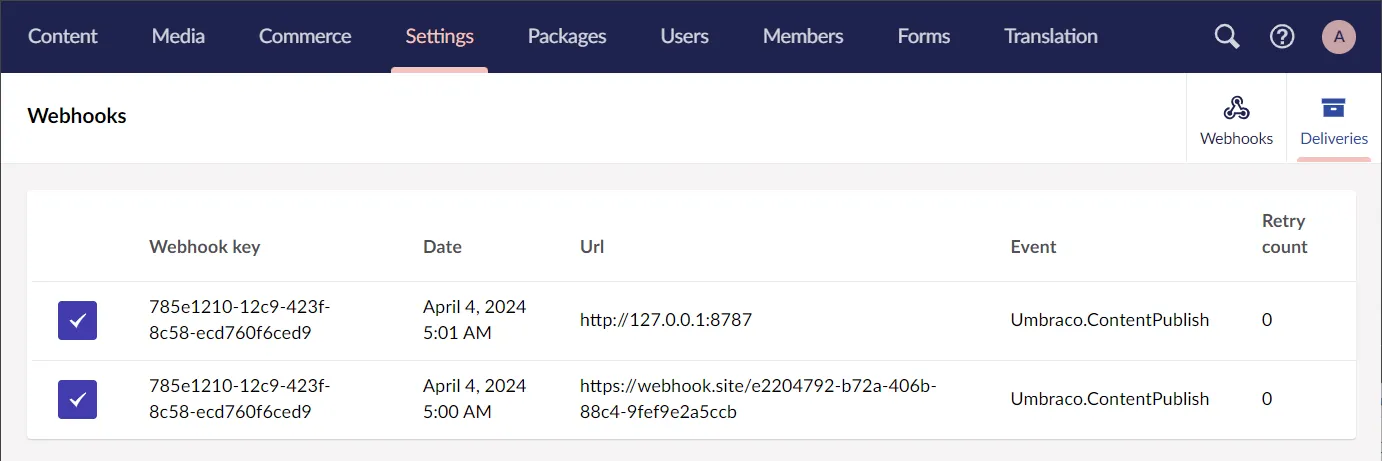
Clicking the entry shows the details of the webhook execution, and the response does indeed resemble the payload:
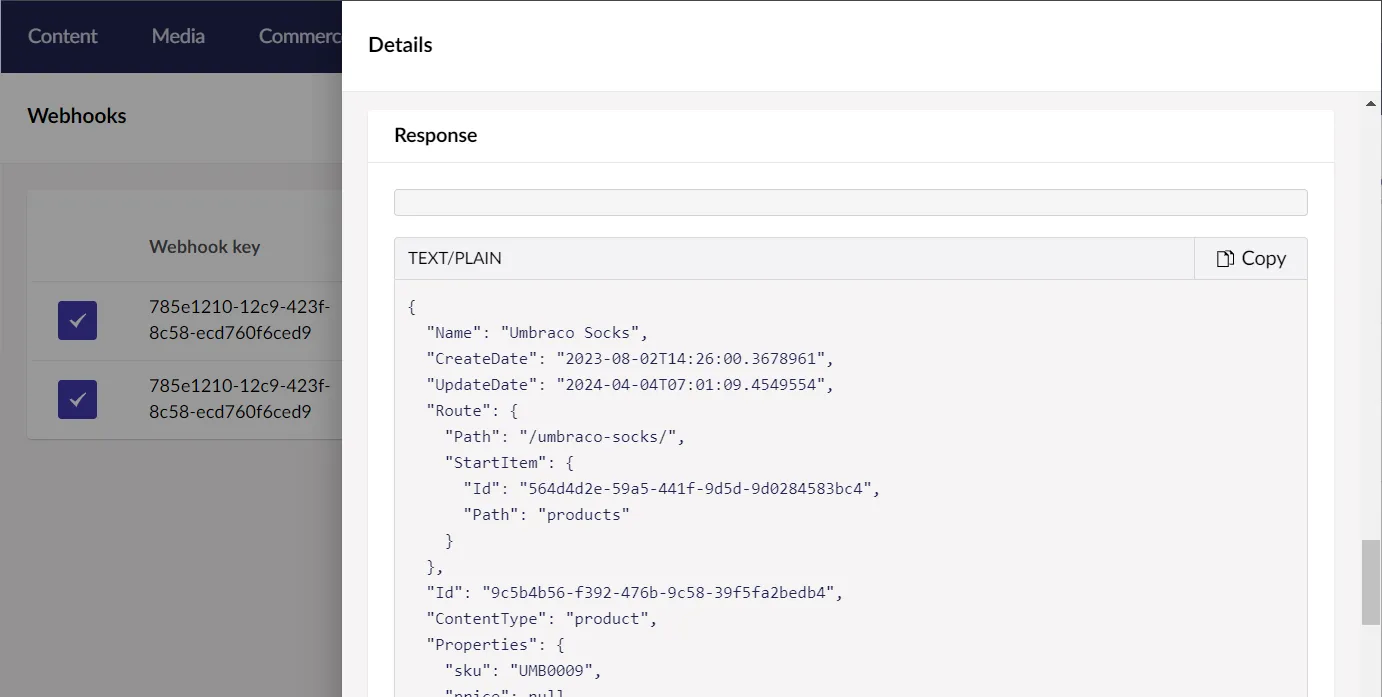
Things are looking good!
Pushing products to Relewise
Now it’s time to push the products to Relewise. First and foremost this requires an account at Relewise, so go sign up for a 14 day trial.
If you’re asked for a product feed URL during sign-up, just skip that part, as this is all about pushing products via the Relewise API.
Once the sign-up is complete, you’ll have access to “My Relewise”. Log in and navigate to “API Keys” under “Administration”.
First order of business is to create a new API key to use for the integration. Assign all “Content” and “Product” permissions under “Integration” when creating the key.
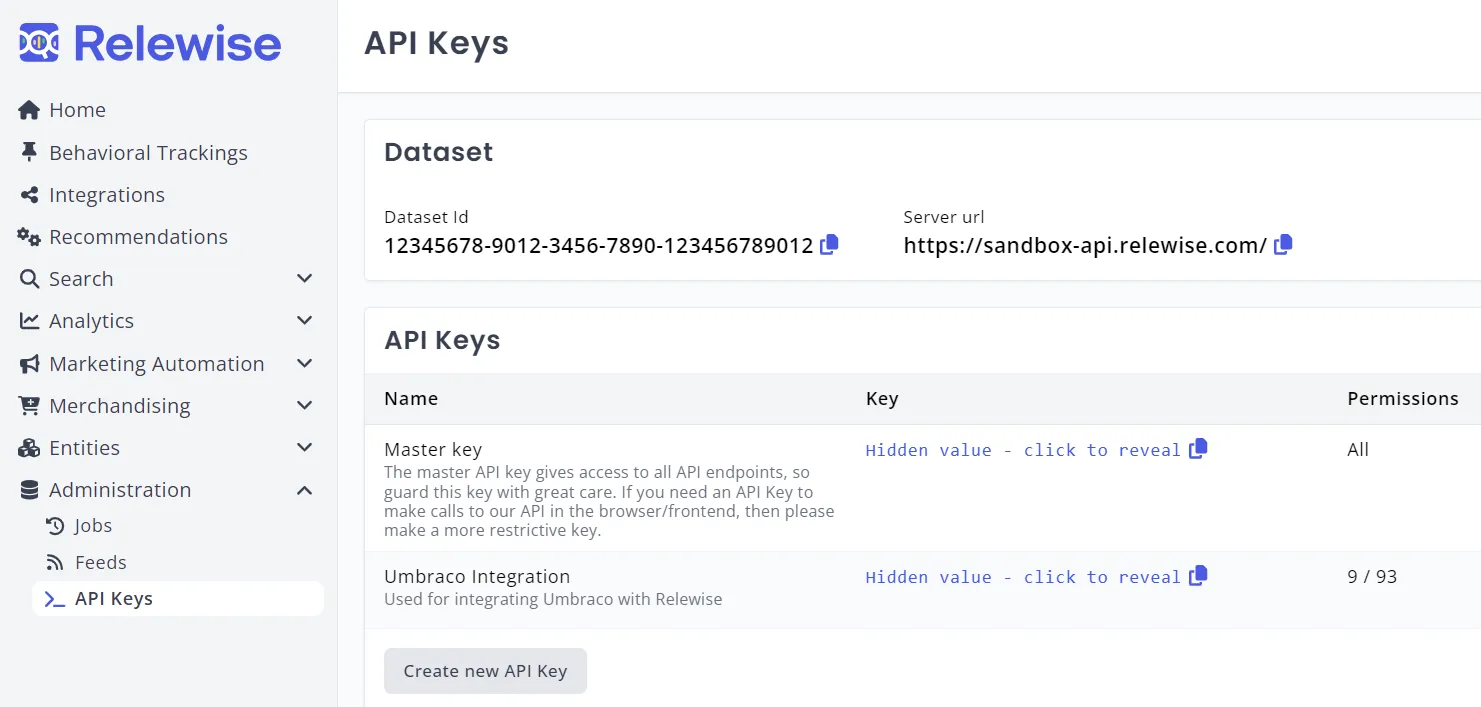
The API key, the dataset ID and the dataset server URL will be used when performing API operations from the Worker, so copy those to somewhere.
And now it’s time to finalize the Worker implementation 🤘 I’ll be taking it step by step here, but you’ll find the full implementation in the GitHub repo.
Relewise ships a JavaScript SDK for easy integration with their APIs, so that needs to be installed:
npm install @relewise/client
npm install @relewise/integrations
To perform product updates, a few SDK imports are necessary:
import {ProductAdministrativeActionBuilder, ProductUpdateBuilder, ProductVariantBuilder, Integrator} from "@relewise/integrations";
import {DataValueFactory} from "@relewise/client";
I’ll also declare the Integrator using the API key and dataset info from Relewise:
const integrator = new Integrator('[your dataset ID]', '[your api key]', {serverUrl: '[your dataset server URL]'});
Lastly I’ll define a few constants for my language and currency:
const english = 'en';
const eur = 'eur';
Handle publishing
When a product is published, I want the product SKU and name along with the properties shortDescription, longDescription and tags to be added to the Relewise dataset, to power the product search and recommendation.
If the product has variants, those should be added as well - including all their variant attributes (color, size, age group).
I also want the product createDate and updateDate in the dataset for sorting purposes, and the Umbraco id (key) for future reference.
Lastly, I want to store the product path (route) and a main image URL in the dataset, so it contains all data necessary to render lists of products:
Now… upon closer examination, it turns out that the product variants are not included in the webhook payload. This is due to a performance consideration by Umbraco Commerce, to avoid a potential massive overhead of variant data when rendering products lists.
If the products didn’t have variants, this would of course not be an issue; I could transform the webhook payload and push it to Relewise. But they do vary, and some are even multi-variant 😟 so the variant data is definitively necessary.
To work around this, I’ll only use the webhook payload to get the ID of the product, so I can re-fetch the product from the Umbraco Delivery API. By using property expansion, the API output can be enriched with the variant data.
This is not the most effective approach, but it gets the job done 🤷 and at least it only happens at publish time:
async function handlePublish(json, umbracoHost) {
    // the publish webhook payload does not contain product variant data,
    // so let's fetch the entire product including its variants
    const umbracoId = json.Id;
    const response = await fetch(
        `${umbracoHost}/umbraco/delivery/api/v2/content/item/${umbracoId}?expand=properties[variants]`
    );
    json = await response.json();

    // make sure it is indeed a product before parsing it
    const contentType = json.contentType;
    if (contentType !== 'product') {
        return new Response(`Unable to handle content type: ${contentType}`, {
            status: 400,
        });
    }

    // helper method: removes all HTML tags and newlines from a RichText value
    const sanitizeRichText = (richTextValue) => richTextValue.markup
        .replace(/<[^>]*>?/gm, '')
        .replace(/\n/gm, ' ');

    // create a "product update" instruction for Relewise
    const productUpdate = new ProductUpdateBuilder({
        id: json.properties.sku,
        productUpdateKind: 'ClearAndReplace',
        variantUpdateKind: 'ClearAndReplace',
        replaceExistingVariants: true
    }).displayName([
        {language: english, value: json.name},
    ]).data({
        // these are the data points that should be used for search and recommendation
        'Path': DataValueFactory.string(json.route.path),
        'ShortDescription': DataValueFactory.multilingual([
            {
                language: english,
                value: json.properties.shortDescription
            }
        ]),
        'LongDescription': DataValueFactory.multilingual([
            {
                language: english,
                value: sanitizeRichText(json.properties.longDescription)
            }
        ]),
        'Tags': DataValueFactory.stringCollection(json.properties.tags),
        // these data points are for sorting (unix timestamps)
        'CreateDate': DataValueFactory.number(new Date(json.createDate).getTime()),
        'UpdateDate': DataValueFactory.number(new Date(json.updateDate).getTime()),
        // these data points "just" needs storing in the search index for future use
        'MainImage': DataValueFactory.string(`${umbracoHost}${json.properties.images[0].url}`),
        'UmbracoId': DataValueFactory.string(umbracoId)
    });

    // extract the variants (if there are any) - this includes sales price per variant
    const variants = extractVariants(json);
    if (variants.length) {
        productUpdate.variants(variants);
    } else {
        // no variants - set the sales price on the product itself
        const price = [{
            currency: eur,
            amount: json.properties.price.withTax
        }];
        productUpdate
            .listPrice(price)
            .salesPrice(price);
    }

    // execute the product update
    await integrator.updateProduct(productUpdate.build());

    return new Response();
}

function extractVariants(json) {
    const variants = json.properties.variants;
    const items = variants?.items;
    const attributes = variants?.attributes;

    if (!items || !items.length || !attributes) {
        return [];
    }

    // map variant items and their attributes to the Relewise ProductVariant format
    return items.map((item) => {
        let data = {};
        Object.entries(item.attributes).forEach(([attributeAlias, attributeValueAlias]) => {
            const attribute = attributes.find((attr) => attr.alias === attributeAlias);
            if (!attribute) {
                return;
            }

            const attributeValue = attribute.values.find((value) => value.alias === attributeValueAlias);
            if (!attributeValue) {
                return;
            }

            data[attribute.name] = DataValueFactory.multilingualCollection([
                {
                    language: english,
                    values: [attributeValue.name]
                }
            ]);
        });

        const price = [{
            currency: eur,
            amount: item.content.properties.price.withTax
        }];
        return new ProductVariantBuilder({id: item.content.properties.sku})
            .data(data)
            .listPrice(price)
            .salesPrice(price)
            .build();
    });
}
That’s a bit of a mouthful! Here’s a brief walkthrough of the code:
- Fetch the product data from the Delivery API.
- Ensure that the returned JSON indeed represents a product.
- Declare a “product update” instruction with all the relevant data for the dataset.
- If there are any variants in the product, extract and append the variant data (including variant sales prices). Otherwise set the sales price directly on the product.
- Execute the product update against Relewise.
Notice I’m using ClearAndReplace as “update kind” in the product update. Relewise recommends using ReplaceProvidedProperties instead, as to not accidentally overwrite product data from other sources. But since I’m always pushing the product in its entirety, ClearAndReplace works great in this case.
Handle unpublishing
When a product is unpublished, it should be disabled in the Relewise dataset, so it no longer appears in search and recommendation results.
At publish time, the product was pushed to Relewise using its SKU as identifier. This makes sense when managing products in My Relewise, since the SKU is likely recognizable to the editors.
However, the Umbraco webhook only contains the Umbraco ID (key) of the unpublished product - not the SKU (which is a content property on the product). Fortunately, the Umbraco ID was also stored in Relewise, which means a “data filter” can be utilized to disable the product in Relewise:
async function handleUnpublish(json) {
    const umbracoId = json.Id;

    // create a "disable product" instruction for Relewise (using a data filter by Umbraco ID)
    const disableProduct = new ProductAdministrativeActionBuilder({
        language: null,
        currency: null,
        filters(filterBuilder) {
            filterBuilder.addProductDataFilter(
                'UmbracoId',
                (conditionBuilder) => conditionBuilder.addEqualsCondition(
                    DataValueFactory.string(umbracoId)
                )
            );
        },
        productUpdateKind: 'Disable',
    });

    // execute the instruction
    await integrator.executeProductAdministrativeAction(disableProduct.build())

    return new Response();
}
Moment of truth 🫣
That should just about do it. Start the Worker back up with npm run start and re-publish a product in Umbraco.
Once the resulting webhook execution is done, head on over to My Relewise and find the product in the “Products” section under “Entities”.
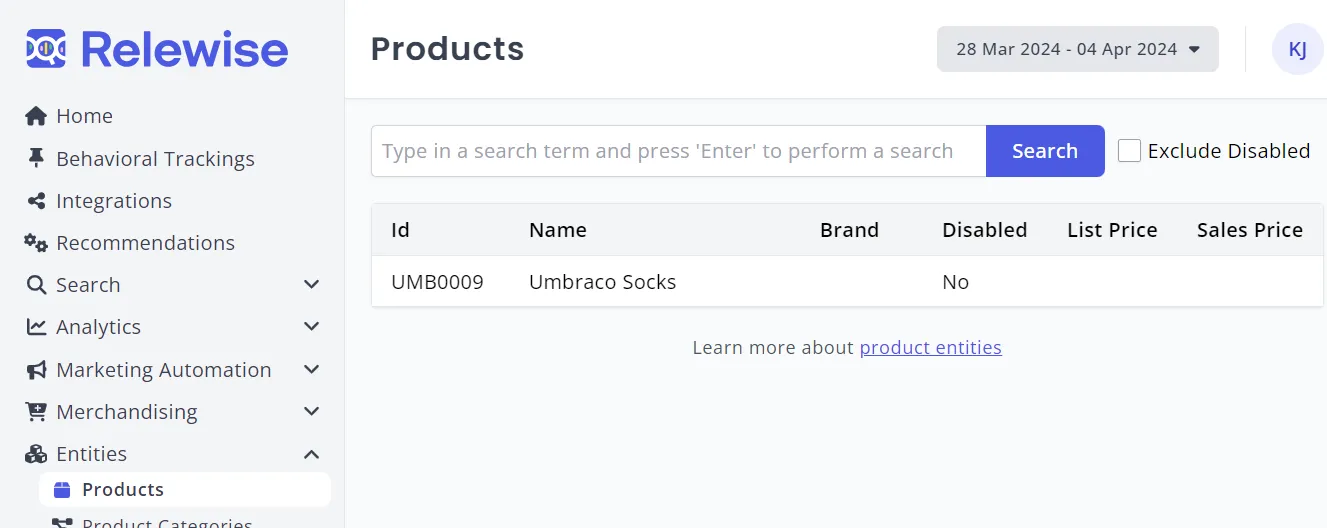

…and unpublishing the same product results in it becoming disabled in Relewise:

Hooray 🎉
Parting remarks
Complex product data now flows seamlessly from Umbraco to Relewise. I don’t know about you, but I call that a great success!
Even better, it’s achieved by using only built-in, well documented features from the involved platforms, and writing a mere 170 lines of JavaScript plumming for the Worker (which includes a whole bunch of code comments and read-friendly indentation).
Even better still, not a single line of .NET code had to be written for all this to work 👏
Despite the relatively tiny Worker implementation, the code is actually quite capable. For example, it automatically picks up on new product variation types and passes them on to Relewise. This of course is more a testament to the adaptability of the Umbraco Commerce data model and the Relewise platform, than it is a testament to my JavaScript abilities 😝
I’m really sold on this approach of connecting Umbraco with external systems using webhooks and Workers. It opens up for a whole new way of including a broader developer community that isn’t necessarily .NET oriented 🫶
As for the Relewise integration, their APIs are very easy to work with. And it’s super neat to see the product data come to life within the Relewise platform. On that note - check out the next section too 😉
Happy integrating 💜
Bonus: Relewise demo store
As part of their free trial, Relewise offers a demo store to showcase their features against your own products. That’s a pretty neat touch if you ask me.
There’s a link to the demo store on the front page of My Relewise.
Normally when onboarding a free trial, the Relewise team will setup the demo store to work nicely with the supplied product feed.
…remember how I didn’t supply one when signing up for the trial previously in this post? 🙈
Actually, the demo store displays the products just fine without any setup. The search functionality, however, needs a little TLC. Fortunately that’s pretty simple to do.
Start by creating a search index. Go to “Indexes” under “Search” in My Relewise:
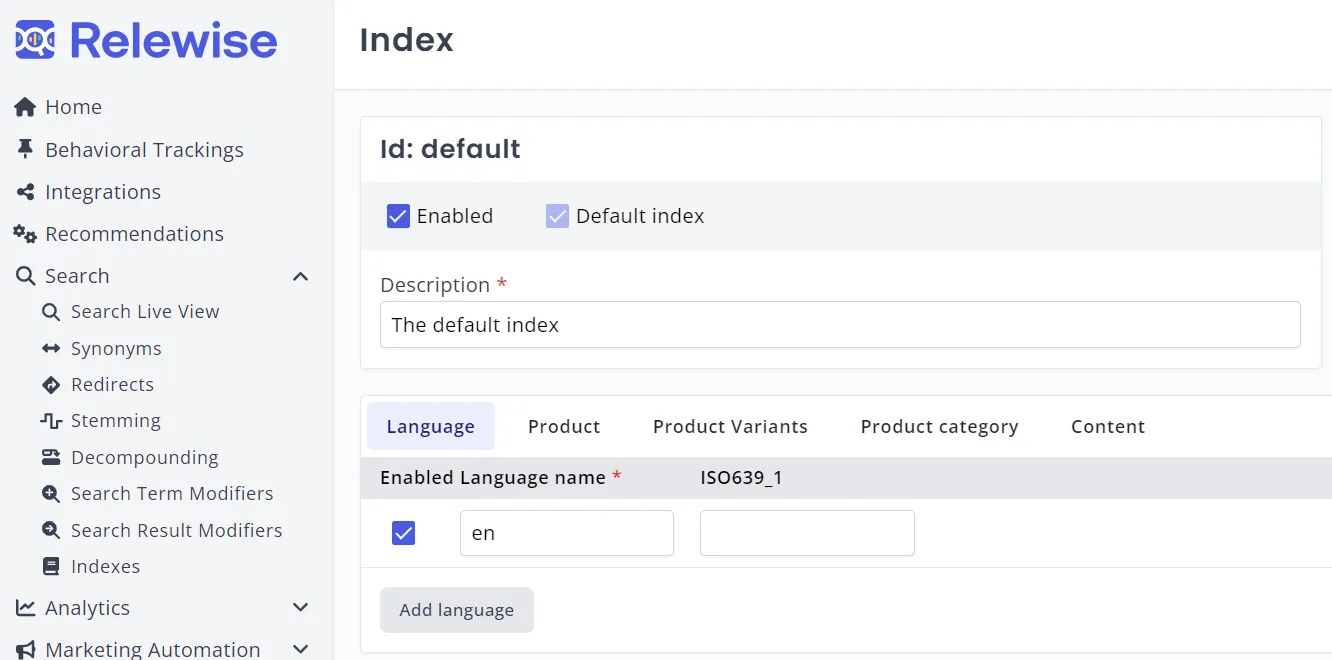
When creating the index, it’s very important to use the same language name as was used when pushing products to Relewise - “en” in this case.
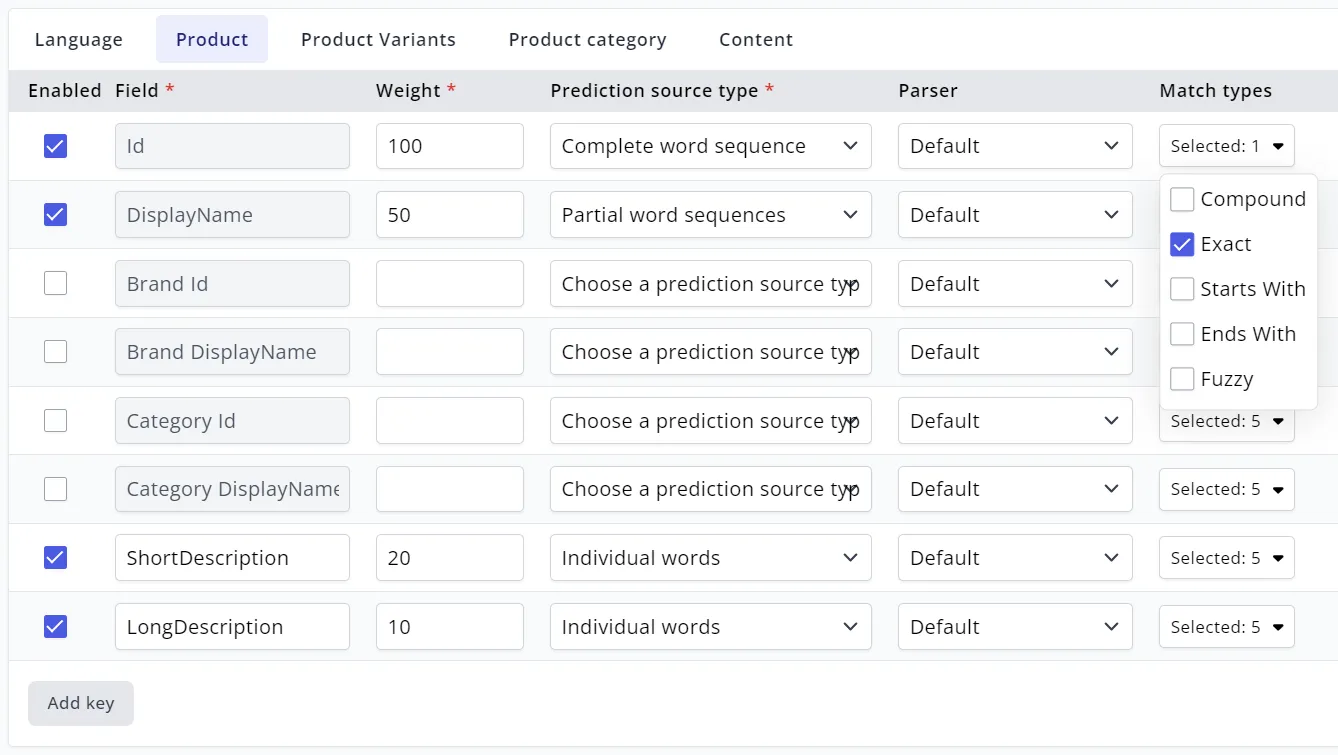
From here on out it’s all about experimenting with different search fields 🧪 the seacrh index can be configured quite elaborately:
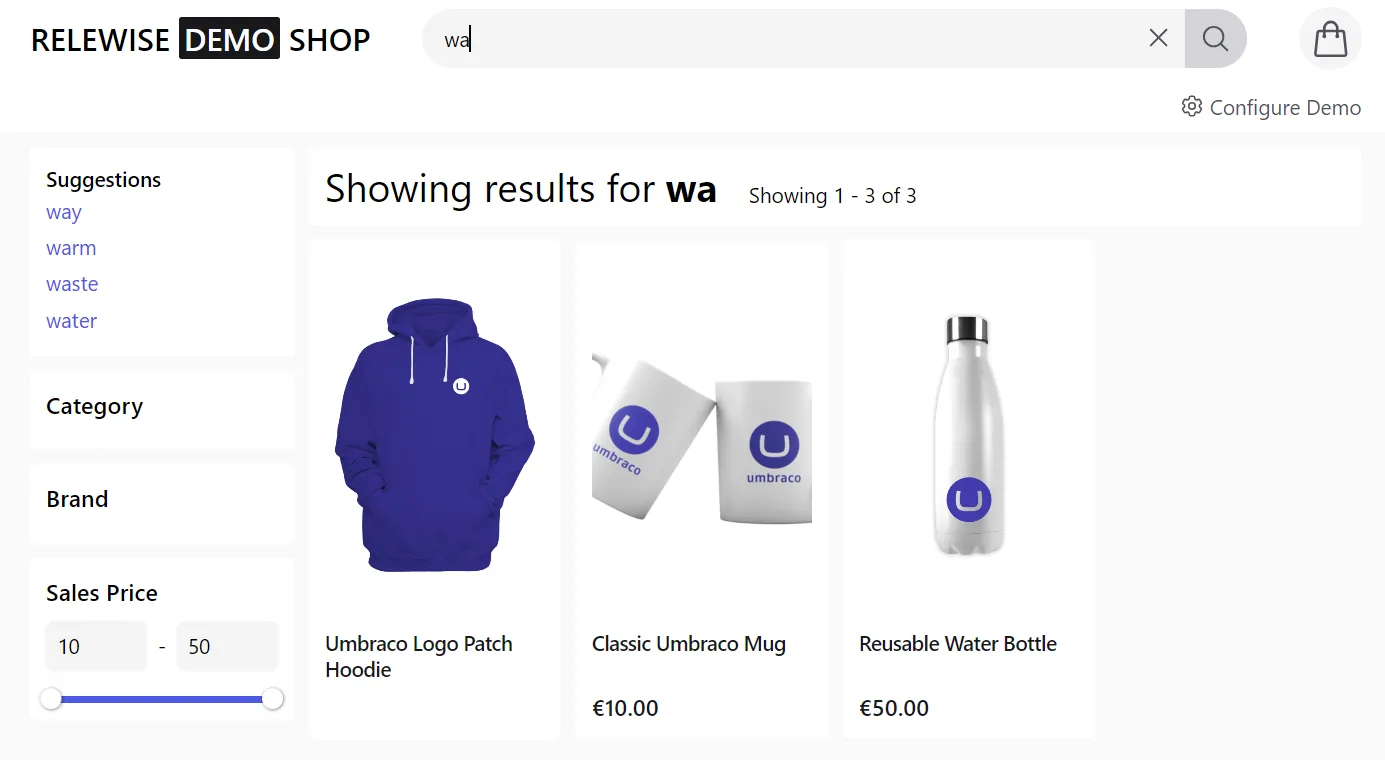
And now, my demo store search works 👏
If you’re going to tinker with this, make sure to check out the best practices for search index configuration.