Uncovering the Next.js example for Umbraco

As I mentioned a while ago, Next.js has an official Umbraco example which showcases how the Delivery API can serve content for a statically generated Next.js site.
Even though the example is a somewhat simplistic blog, advance knowledge of Next.js is still required to understand what makes it tick. Therefore, it’s no wonder that since it was released, a few people have been asking me for guidance on how to work with it.
Now… I don’t claim to be any kind of Next.js expert. Not by far. But I did pick up a few things while creating the example in the first place, and there really is no reason not to share ❤️
In this post I’ll guide you through extending the example with additional functionality. The reasoning behind this is twofold:
- Hopefully it’ll help Next.js newcomers understand the inner workings of the example and aid in further exploration 🤗
- It’s a chance to explore how the Delivery API can be tailored to support more advanced functionally 🤓
To follow along, start by performing the steps outlined in the previous post. This will be the reference point for the remainder of this post.
Rebuild the Delivery API index
First and foremost, the Examine index that powers the Delivery API might need a rebuild, if you just cloned down the original source.
When the Umbraco site is running, you can log into the Umbraco backoffice as admin using:
- Username: admin@localhost
- Password: SuperSecret123
Once logged in, go to the “Settings” section. Here you’ll find an “Examine Management” dashboard, where you can click the “DeliveryApiContentIndex” Examine index. At the very bottom of the index overview you’ll find a “Rebuild index” button ⚒️
Project structure
Before the hacking starts, I need to point out a few important parts of the example project structure:
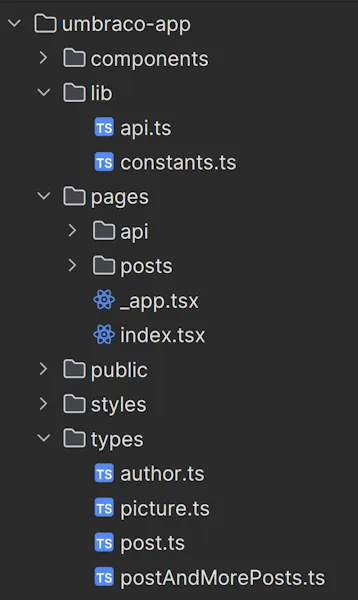
/lib/api.tsis where all querying against the Delivery API happens./pagesis where the individual page types of the example exist./typescontains the TypeScript types that make up the contract against the Delivery API.
The task at hand
You’ll be adding an author page to the Next.js example. The page will display an author biography, as well as the most recent blog posts by the author.
This means that the author content model in Umbraco must be extended with biography data. To keep the complexity low, just add the biography as a simple rich text field:

Now fill out the biography for all three authors and publish them, so they’re ready to be consumed in the following sections.
The author page
Buckle your seatbelts. There’s a lot of code coming your way, and a fair bit of Next.js voodoo 😣
I’ll do my best to explain what’s happening along the way.
Routing the authors
Authors are a dynamic content resource, because they can be added or changed at any time. As such, they cannot be routed statically. This means the Next.js router needs to apply Dynamic Routes to the author page.
And here’s where the magic begins 🪄
The Next.js router perceives a route as dynamic if it encounters a route segment in square brackets. This is known as a Dynamic Segment. When a Dynamic Segment is detected, the router attempts to resolve whatever is inside the square brackets from the current “path parameters”.
When building a statically generated site, Dynamic Routes must be supplied at build time by implementing a special method called getStaticPaths.
In the case of the author page, getStaticPaths must query the Delivery API for all authors and return their URL segments as slug parameters for the router. Since all things Delivery API are handled by api.ts, this is where you should implement the querying:
const extractAuthorSlug = (item: any): string => item.route.path.replace(/^\/|\/$/g, '');

export const getAllAuthorSlugs = async (preview: boolean): Promise<string[]> => {
    const json = await fetchMultiple(
        `fetch=children:/&sort=updateDate:desc&take=100`,
        "authors",
        preview,
    )
    return json.items.map((author) => extractAuthorSlug(author));
};
Note how the method uses fetchMultiple, which is one of many helper methods in api.ts. Ultimately this results in a Delivery API query that fetches the first 100 children of the authors root item in the Umbraco content tree:
GET [Umbraco host]/umbraco/delivery/api/v2/content?fetch=children:/&sort=updateDate:desc&take=100
Start-Item: authors
With the new method in place, go ahead and create the author page in /pages/authors/[slug].tsx with the following content:
import {getAllAuthorSlugs} from "../../lib/api";

export default function AuthorDetails({ preview }) {
  return (
      <p>To be done.</p>
  );
}

export async function getStaticPaths({ preview }: { preview: boolean }) {
  const slugs = await getAllAuthorSlugs(preview);
  return {
    paths: slugs.map((slug) => ({
      params: {
        slug: slug
      }
    })),
    fallback: false
  };
}

export async function getStaticProps({ params, preview }: {
    params: {
        slug: string
    };
    preview: boolean;
}) {
    return {
        props: {
        }
    };
}
The author page getStaticPaths implementation calls getAllAuthorSlugs to obtain the slug for all authors, and returns them to the Next.js router as path parameters in the paths array.
If you fire up (or restart) the blog, you can now visit the author pages - for example /authors/code-coder.
At this point, the author page only contains a rather disappointing “To be done.” message, but that’ll be fixed in the next section 👇
ℹ️ Quick recap:
- The author page name contains the Dynamic Segment
[slug]. This triggers a call togetStaticPathswhen Next.js generates the blog pages. getStaticPathsmust yield apathsarray with the path parameters required to resolve the Dynamic Segment of all author pages.- The value of the supplied
slugpath parameter for an author page is the author URL segment from Umbraco.
Rendering the authors
The next order of business is to render the author page. This is where getStaticProps comes into play.
Once Next.js has finished resolving the Dynamic Routes, all the resulting pages are generated by calling getStaticProps with the supplied path parameters.
For the author page, this means that getStaticProps must fetch the relevant author data (that is, the author details and the most recent author posts) from the Delivery API using the author slug.
Remember how the author page slug path parameter is really the author URL segment in Umbraco? Well… incidentally, the Delivery API allows for fetching content items using their URL segments. What luck 😜
But! First and foremost, you need to declare a new type for this data in the /types folder:
import Post from "./post";
import Author from "./author";

type AuthorAndAuthorPosts = {
    author: Author;
    posts: Post[];
};

export default AuthorAndAuthorPosts;
Also, the Author type needs amending to support both the author slug (for linkage) and the biography. So go ahead and add those to /types/author.ts:
import Picture from "./picture";

type Author = {
    id: string;
    name: string;
    picture: Picture;
    // add these
    slug: string;
    biography: string;
};

export default Author;
Now head on over to api.ts once more to implement the author data fetching:
import AuthorAndAuthorPosts from "../types/authorAndAuthorPosts";

export const getAuthorAndAuthorPosts = async (
    slug: string,
    preview: boolean,
): Promise<AuthorAndAuthorPosts> => {
    const authorJson = await fetchSingle(slug, "authors", preview);
    const author = extractAuthor(authorJson);
    const authorPostsJson = await fetchPosts(false, 10, preview);
    const authorPosts = authorPostsJson.items.map(extractPost);
    return {
        author: author,
        posts: authorPosts,
    };
};
This implementation once more leverages some of the existing helper methods in api.ts. For example, the fetchSingle call eventually ends up yielding a Delivery API request like this:
GET [Umbraco host]/umbraco/delivery/api/v2/content/item/code-coder
Start-Item: authors
… and the fetchPosts call ends up performing another query to fetch the latest blog posts:
GET [Umbraco host]/umbraco/delivery/api/v2/content/?fetch=children:/&sort=updateDate:desc&take=10
Start-Item: posts
Turning back to the implementation, the extractAuthor method of api.ts need to be amended, to handle the new author data:
const extractAuthor = (author: any): Author => {
    return {
        id: author.id,
        name: author.name,
        // add these
        slug: extractAuthorSlug(author),
        biography: author.properties.biography?.markup ?? '',
        // update this
        picture: author.properties.picture
            ? {
                url: `${UMBRACO_SERVER_URL}${author.properties.picture[0].url}`,
            }
            : {
                url: ""
            }
    };
};
With the api.ts changes in place, getStaticProps can be implemented for the author page:
import {getAuthorAndAuthorPosts} from "../../lib/api";

export async function getStaticProps({params, preview}: {
    params: {
        slug: string
    };
    preview: boolean;
}) {
    const authorAndAuthorPosts = await getAuthorAndAuthorPosts(params.slug, preview);

    return {
        props: {
            author: authorAndAuthorPosts.author,
            posts: authorAndAuthorPosts.posts,
            preview: preview || null
        }
    };
}
And now, at long last, the author page rendering can be implemented, using the props output from getStaticProps as input for the rendering:
import Author from "../../types/author";
import Post from "../../types/post";
import ErrorPage from "next/error";
import Layout from "../../components/layout";
import Container from "../../components/container";
import Header from "../../components/header";
import Head from "next/head";
import Image from "next/image";
import BodyStyles from "../../components/post-body.module.css";
import SectionSeparator from "../../components/section-separator";
import PostPreview from "../../components/post-preview";

export default function AuthorDetails({author, posts, preview}: {
    author: Author;
    posts: Post[];
    preview: boolean;
}) {
    if (!author) {
        return <ErrorPage statusCode={404} />;
    }

    return <Layout preview={preview}>
        <Container>
            <Header />
            <article className="max-w-2xl mx-auto">
                <Head>
                    <title>
                        {author.name} | Next.js Blog Example
                    </title>
                    <meta property="og:image" content={author.picture.url}/>
                </Head>
                <h1 className="text-6xl md:text-7xl lg:text-8xl font-bold tracking-tighter leading-tight md:leading-none mb-12 text-center md:text-left">
                    {author.name}
                </h1>
                <div className="mb-8 md:mb-16 sm:mx-0">
                    <Image src={author.picture.url} alt={author.name} width={400} height={400} className="shadow-small"/>
                </div>
                <div className={BodyStyles.content} dangerouslySetInnerHTML={{__html: author.biography}} />
            </article>

            {posts && posts.length > 0 && (
                <>
                    <SectionSeparator/>
                    <section>
                        <h2 className="mb-8 text-6xl md:text-7xl font-bold tracking-tighter leading-tight">
                            Stories by {author.name}
                        </h2>
                        <div className="grid grid-cols-1 md:grid-cols-2 md:gap-x-16 lg:gap-x-32 gap-y-20 md:gap-y-32 mb-32">
                            {posts.map((post) =>
                                <PostPreview key={post.slug} title={post.title} coverImage={post.coverImage} date={post.date} slug={post.slug} excerpt={post.excerpt} author={author} />
                            )}
                        </div>
                    </section>
                </>
            )}
        </Container>
    </Layout>;
}
If all want according to plan, the /authors/code-coder page should look something like this:
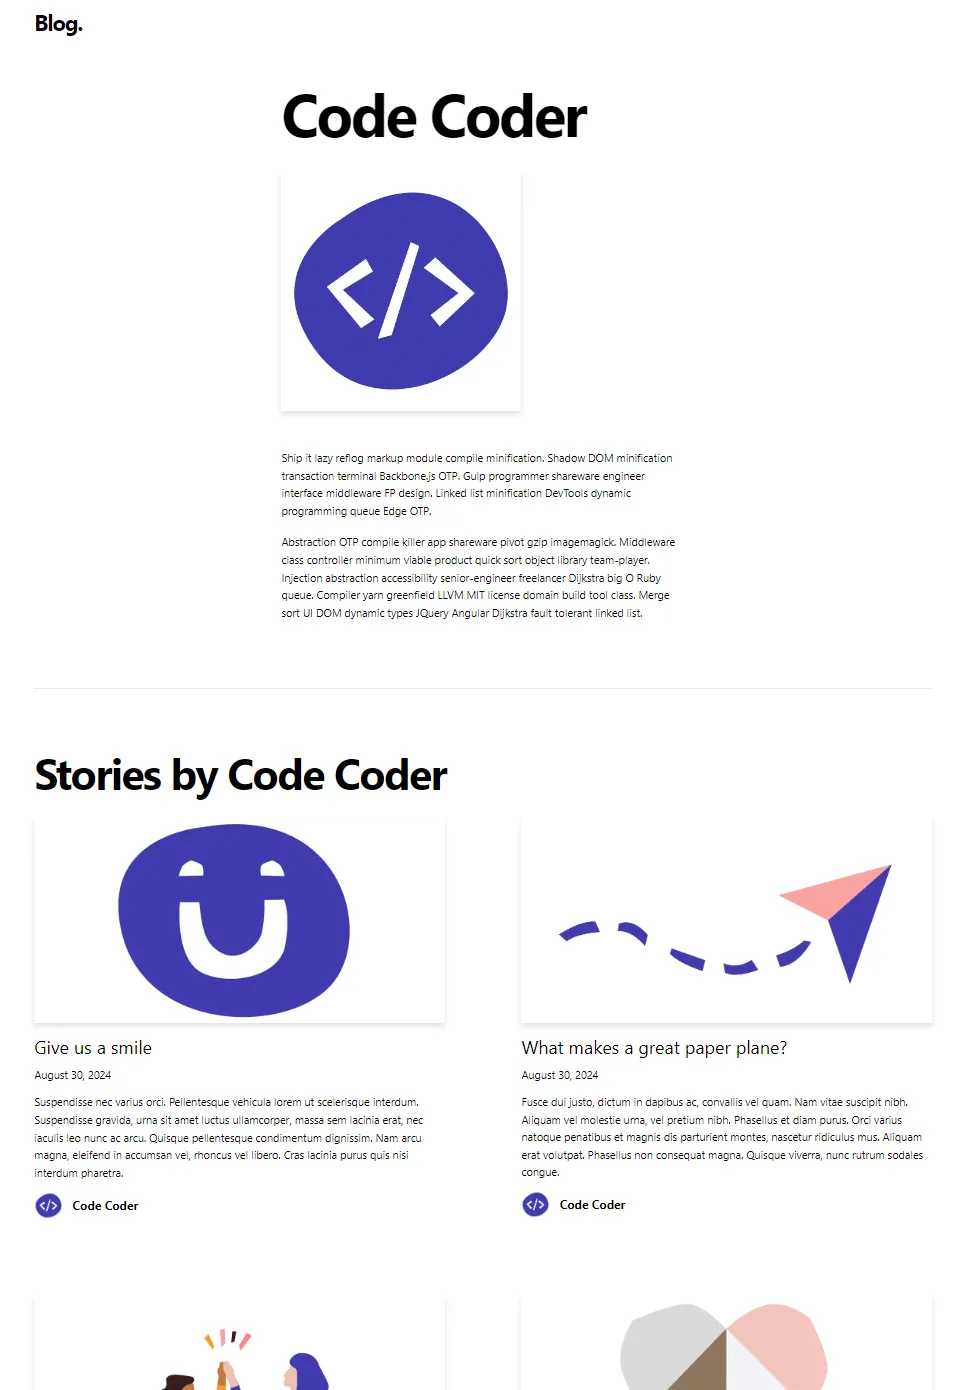
Uuh, fancy! ✨
The last piece of the Next.js puzzle is to link the posts and the authors. Fortunately, this is comparatively quite straightforward.
The Avatar component is responsible for rendering the author image and name when rendering a post, so this is where you need to add a link.
Open /components/avatar.tsx and make the following changes:
import Image from "next/image";
import Author from "../types/author";
// add this import
import Link from "next/link";

type Props = {
    author: Author;
};

export default function Avatar({ author }: Props) {
    const name: string = author?.name;

    return (
        // add this link
        <Link href={`/authors/${author.slug}`} className="hover:underline">
            <div className="flex items-center">
                <div className="w-12 h-12 relative mr-4">
                    <Image
                        src={author.picture.url}
                        layout="fill"
                        className="rounded-full"
                        alt={name}
                    />
                </div>
                <div className="text-xl font-bold">{name}</div>
            </div>
        </Link>
    );
}
And there you have it: Posts and authors are now linked, making the author page reachable whenever a post is rendered 👍
🤨 What’s with those author posts?
The keen eye will have noticed that something is off: The posts rendered on the author page are actually not necessarily written by the author 🙄
Here’s where you can get your geek on with the Delivery API.
At this point, the author page simply renders the latest posts. There is no author filtering going on against the Delivery API query - yet. But as it happens, the Delivery API has an extension API that allows for building custom filters (among other things), which comes in quite handy now.
Since this blog post has turned out quite lengthy already, and since its purpose really is to dissect the Next.js example, I’m not going to dive into a lot of details on custom filter implementations for the Delivery API. I have added the necessary code bits in the GitHub repo for this post, and here’s what you need to do with them:
- Copy AuthorContentIndexHandler and AuthorFilterHandler to your Umbraco site.
- Rebuild and restart your Umbraco site.
- Go to the “Examine Management” dashboard in the “Settings” section of the Umbraco backoffice and rebuild the “DeliveryApiContentIndex” Examine index.
Now go back to api.ts and find the fetchPosts method. Here you’ll need to add a “filter” option in the Delivery API query:
const fetchPosts = async (
    expandAuthor: boolean,
    numberOfPosts: number,
    preview: boolean,
    // add this
    authorId?: string | null
) => {
    const expand = expandAuthor ? "properties[author]" : "";
    const take = numberOfPosts ?? 10;
    // add this
    const filter = authorId ? `author:${authorId}` : '';
    return await fetchMultiple(
        // include "&filter=${filter}" here
        `fetch=children:/&filter=${filter}&expand=${expand}&sort=updateDate:desc&take=${take}`,
        "posts",
        preview,
    );
};
And then pass in the author ID from the getAuthorAndAuthorPosts method:
export const getAuthorAndAuthorPosts = async (
    slug: string,
    preview: boolean,
): Promise<AuthorAndAuthorPosts> => {
    // ...
    const author = extractAuthor(authorJson);
    // add author ID here
    const authorPostsJson = await fetchPosts(false, 10, preview, author.id);
    // ...
};
And presto! The author page now only lists the posts that are actually written by the author 🫠
The end (at long last!)
Phew! That ended up being a lenghty post 😅 thanks for sticking with me ‘till the end.
Next.js is quite potent and also a real head-scratcher. And this post only scratches the surface of what Next.js can do. There’s plenty more to learn 🤩
You’ve probably noticed the preview variables that’s being passed back and forth between APIs and pages. This is all part of the Next.js Draft Mode, which I briefly covered in the previous post.
This is neither the time nor place to go into detail about the Draft Mode, but it is worth mentioning that the author page implementation does support previewing draft author data from the Delivery API.
Anyway! I do hope this post has helped demystify the coupling between Next.js and the Delivery API for static site generation.
Happy hacking 💜